You are currently browsing Perun moto international store. If you are from the EU, please visit www.perunmoto.eu
Menu
-
- Home
- Instructions
- Blog
- Sale!
-
Important Information
-
Products
- 2008-2018 KTM 690 Enduro R / SMC R
- 2019+ KTM 690 Enduro R/SMC R / GasGas ES/SM 700
- Husqvarna 701 Enduro / Supermoto
- KTM 790/890 Adventure (R)
- Husqvarna Norden 901
- 2013-2020 KTM 1X90 Adventure (R)
- 2021+ KTM 1290 Super Adventure (R/S)
- Yamaha Tenere 700
- Ducati DesertX
- Aprilia Tuareg
- BMW F900GS
- BMW R1300GS
- "Universal" products
-

You are currently browsing Perun moto international store. If you are from the EU, please visit www.perunmoto.eu
Add description, images, menus and links to your mega menu
A column with no settings can be used as a spacer
Link to your collections, sales and even external links
Add up to five columns
Add description, images, menus and links to your mega menu
A column with no settings can be used as a spacer
Link to your collections, sales and even external links
Add up to five columns
How to remove air box on 2014-2018 KTM 690 Enduro - photo instructions
February 26, 2016 2 min read 4 Comments
In order to take proper care of your KTM 690 Enduro it is advisable to learn how to remove and install air box. Bike on the photos is 2016 KTM 690 Enduro R, but everything is almost the same on all 2008-2018 690's.
We made separate instructions for 2019-on bikes - HERE.
1. First, remove the seat and plastic side covers.

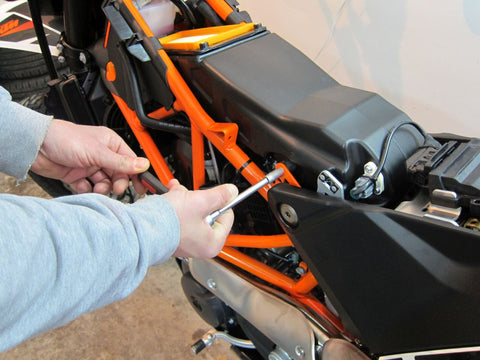
2. Loose the reg/rec. Just remove the bolts and leave it dangling on the wires.

3. Remove air box lid.

4. Remove four little bolts holding the air box. Front bolts are easily accessible through holes on the plastic cover. One hole is behind reg/rec.
5. Unplug this hose. Remember how it was routed.
6. Cut the plastic tie holding air temp sensor wire and remove air temp sensor out of air box.
On 2008-2013 models air temp sensor is bellow air box.
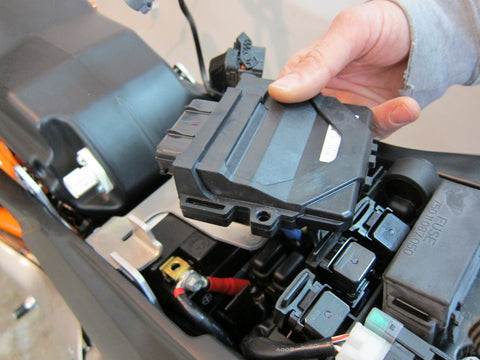
6.1. Optional - to make more room, remove ECU unit.
7. Now only rubber boot is holding the air box to the throttle body. Pay attention here. On 2014-2016 models there are two hose clips, but only one should be loosened (not removed), the one marked in green. Leave the one marked in red.

This is easily doable while air box is still connected with throttle body, with screw driver, from side.

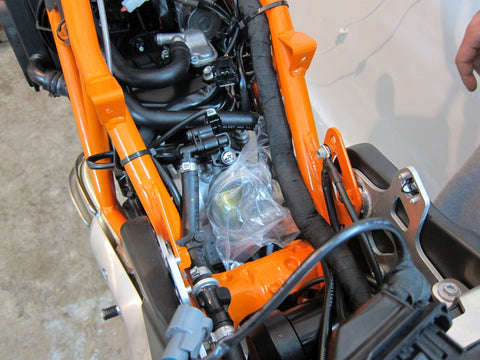
8. Now air box can be removed. Lift the rear of the air box, pulling the rubber boot off the throttle body, then twist it and pull it out.
9. Secure throttle body opening with plastic bag or similar, to prevent debris and dirt from entering.
Done!
When you finish what ever you were doing, follow the same steps backwards.
Few tips.
1. Apply some grease on throttle body, so rubber boot slides easily.
2. If you forgot how breather hose was routed, here is the picture.
3. Be gentle on hose clip holding the rubber boot onto throttle body. Make sure rubber boot is positioned well, then there is no need to tight it too much.
4. Also, be gentle on four little bolts holding the air box - they are screwed into rubber cushion elements, so don't over tighten them.
5. Very important - be very, very gentle with two bolts holding air box lid. Tight them by hand only!
6. Don't forget to secure air temp sensor wires with plastic clip.
If I missed something, please let me know!
4 Responses
Jon Pickup
February 27, 2017
Just to say thanks for this posting big help!! Wasn’t sure what to do but this step by step with photos has really made the job straight forward!!
Thanks again
Jon
Jonathan Livingston
September 18, 2016
I started this job yesterday, then stopped, because not seeing what is underneath the box means this would be a ‘trial and error’ job. One click on Google and voila, complete with photos. Fantastic job – bravo!
Dave Pidcock
June 12, 2016
Thanks so much for these instructions Nikola – saved my butt ;)
We should all be very grateful for people like you who take the time to do do much to help us novices – greatly appreciated
Dave
Australia
Leave a comment
Comments will be approved before showing up.


Shem Ishler
January 27, 2025
Excellent tutorial!!!!! I wish more folks would be as thorough and concise as ya’ll were with this one. Glad I’ve already purchased some of your products and believe I’ll lean that way in the future.